Thursday, December 17, 2015

short and sweet. . . and delicious!

I am super tired tonight, but I think that I am pretty close to being ready for Christmas.  Tomorrow is the last day before vacation and I am ready!  I am ready for sleeping in and relaxing days and some fun baking!  We just finished a weekend that was filled with a Christmas party and three kids performances of some sort or another.  So.Much.Fun!  This post is going to be super short, but the cookies can just speak for themselves. . . oh and they are gluten free! 

Also. . . go splurge and get a Theo baking bar or just buy the candy bar. . . so delicious!  They are my obsession (plus they don't use soy in their chocolate, so Weston can enjoy, too!). 
 

Chocolate Brownie Cookies {Gluten Free}
From Bon Appetit

Ingredients:
3 cups powdered sugar, gluten free if you need it to be
3/4 cup unsweetened cocoa powder
1 tsp kosher salt
2 large egg whites
4 oz. bittersweet chocolate, chopped*
3 tbsp cocoa nibs or mini chocolate chips**

Directions:
Preheat oven to 350.  Whisk powdered sugar, cocoa powder and salt together. Stir in egg whites and egg.  Fold in chocolate and nibs.  Spoon batter with cookie scoop onto silpat lined baking sheet.  Bake for about 14 minutes.  Rotate cookie sheet half way thru.  They are done when they are puffed, and cracked.  Let them cool on the pan so they firm up a bit.

*We use the Theo baking chocolate, which has no soy or dairy in it and it's AMAZING!
** I used Ghiradelli mini chocolate chips


Monday, December 07, 2015

What's for dinner (November Edition)

November is one of my favorite months in the whole year.  Really, it is.  It's my birthday month, the leaves finally start to change colors, the temperature finally drops low enough to actually feel cold, and things kind of slow down . . . kind of.  We had the whole week off for Thanksgiving and it was such a nice quiet week.  I finally found my groove and started cooking again.  The Fall weather really got me in the mood for soups, so I made a bunch, and froze some for later, when things REALLY start to get busy again!

Deen Brothers Tail Gate Chili
This is my favorite meat chili to date and hopefully will get a blog post out to show my adaptations on this yumminess.  It really is scrumptious.


Grandma's Corn Chowder
I don't have a really good picutre of this recipe. Another recipe that I really need to write up a blog post on.  My friend Steph, over at Epiphanie designs introduced me to this recipe years ago and it is so delicious. . . even with Soy Milk instead of regular milk (yay for dairy-free friendly).  But the link is at the bottom and it is sooo delicious! 

Pumpkin Pancakes
I can't tell you how many times I have made these pancakes, but they are delicious!  I think it's the hint of molasses that is added to the batter!  They cook up great and if you have any extras, they freeze great, too!  Ethan loves to take them in his lunch with a little dollop of cool whip and some maple syrup.   


Chicken, bacon and corn salad
I am pretty sure, I have posted this one before, but I felt I needed to share that we really have not just been eating soups.  Not that there's anything wrong with that.   Local friends, this salad is made better by some delicious Fresno State corn!  Plus, it's bacon. . . I mean, what could be wrong with a salad filled with bacon?

Garlic Roasted Mushrooms
We tried these out for our small family Thanksgiving and they were amazing!  My husband isn't a fan of mushrooms, so I might have eaten the majority of these myself. . . no shame. . . no shame!  They were really easy and turned out soft and carmel-ly.  I will definitely be making these again and trying the Earths Best non dairy butter. . . 


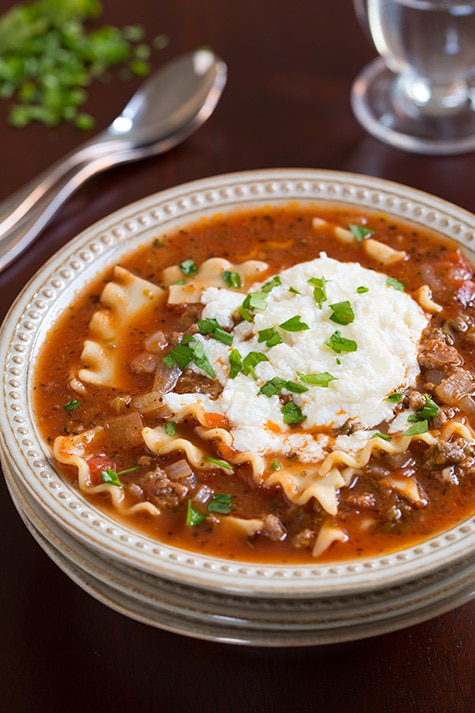
Lasagna Soup
This soup was super easy and really yummy!  I will probably be taking some out of the freezer and making it this week for a quick dinner.  We served some fresh french bread on the side and it was perfect to dip in the sauce!  I am really getting hungry typing this post! 

So, that's a peek into last month's menu plans.  What are you making?


1/2/3/4/5/6

Thursday, December 03, 2015

Cranberry Scones

My list of things to do seems to be always growing and even though at times, I feel overwhelmed or discombobulated, I just like to sit and give my mind a break.  It might be one of my favorite thing to do and with kids, it is super hard to do it. . . unless I stay up really late, like tonight.  It is so worth it!

I decided to subscribe to the Feel'n channel for the month of December and I am probably going to torture my wonderful husband by watching chick flicks all month.  He is currently asleep as I watch The Makeover and type up this blog post.  And after cleaning house all day, I am enjoying just sitting here in a quiet house watching a chick flick with no one needing anything.


Scones are one of my favorite things to bake.  They freeze well and they taste wonderful.  Plus, if you use the food processor, it takes WAY less time and cuts butter amazingly.  I think that scones are sometimes feared, but they are really quite simple! These scones are wonderful and were a big hit.  Weston even ate them (although he did take out all the cranberries), and if the kids eat them then its a win! 

Usually when I make cranberry scones I just go for the dried cranberries, but at Christmas all those bags of fresh cranberries just call out to baked with.  There's something quite magical about them, because before they are bakes they just look like they could go into a centerpiece, but once they are baked, they are so juicy and sweet and then combined with an orange-almond drizzle you probably can't stop eating them.  

So, the next time you find those bags of fresh cranberries staring at you in the produce section, grab a bag and make up a batch of these scones.  

Orange Glazed Cranberry Scones

Ingredients:
2 cups flour
1 tbsp baking powder
1/4 cup sugar
1/2 tsp salt
2 tbsp orange zest, divided
5 tbsp butter, cold
1 1/2 to 2 cups fresh cranberries
1 cup whipping cream
1 1/2 tsp melted butter
1 1/2 cups powdered sugar
2-3 tbsp orange juice
1/2 tsp almond extract

Directions:
 Preheat oven to 425 degrees.

In food processor, pulse dry ingredients.  Add cold butter and pulse until nice and crumbly.  Add whipping cream and pulse until a ball forms.  Place on floured surface and kneed until smooth.  Slowly add cranberries folding them in.  Roll dough out into a circle and cut into triangles.  Place on lined baking sheet or stone. Brush with whipping cream.  Bake for 13 minutes or until slightly golden.  Let cool. 

In a small bowl, mix melted butter, powdered sugar, orange juice and almond extract together.  Put in a ziplock bag and cut the tip off the corner.  Drizzle with icing.

If you want to freeze them, flash freeze for about an hour and then stick in a freezer bag.  When ready to bake, take out of freezer and bake like normal.  It will probably take a few minutes longer because they are frozen.  Then  make the icing and drizzle over.  Freeze for up to 6 months. 

Happy Baking

Tuesday, December 01, 2015

Finding joy in the waiting {Advent 2015}

There's something really wonderful about this time of the year.
 The lights. 
The music. 
The fun.  It's just exciting!  I love everything about this time of the year (except the cranky crowds. . but we won't go there).  Today marked the official start of Advent and I am just giddy with anticipation as we attempt to daily prepare ourselves for the celebration of Christ's birth.

It is an exciting time as we focus on teaching our two boys what Christmas is all about.  As I sit back (ignoring the long to-do list that eagerly awaits my attention) and reflect on this month's activities, I am drawn to the quiet anticipation that brings unmistakable joy.

Joy that isn't found from presents under the tree or checking items off our Christmas bucket list. It comes in spending time with each other, listening to our 7 year old read from the Bible and watching our 4 year old hear the same stories with new understanding.  The joy is from Christ.  That is the greatest gift of all. 

This year, is the 5th year (I think?) that we have used Truth in the Tinsel and it hasn't gotten old.  Ethan has been reminding me for a few week's now to start getting them ready.  I love how he looks forward with excitement and enthusiasm.  It's contagious.  Especially, when I am tired and wondering if we will even have time to do this at all, after all, he is in school an hour longer now.  I am motivated by my children's desire to celebrate Christ.  They are excited and even though there are nights when I am tired and overwhelmed, its simplicity (especially since I prepare the the lessons ahead of time), make it so easy! 


So, as we wait eagerly for Christmas morning and find baby Jesus in the manger wrapped under the tree, I encourage you to not become overwhelmed, but to sit and soak in the quiet anticipation of Advent.  My quiet may look different than many of yours (there may have been lego mini figures going to battle while Ethan read from Isaiah tonight), but between the things you see around all of the social media outlets that may just drive you to pull out your hair and throw your white flag of surrender up and not do anything, I encourage you to find that one thing that brings you and your family together to focus on Christ and his birth. 

You can read herehere, here and here for more on how we do Truth in the Tinsel and advent. 

Click here to download your own copy. . . it's not too late to start!  You can even do 5 or 10 when you are on Christmas vacation! 

Also, check out this option for the Jesse Tree or this book. . . it's awesome! 

Happy first day of Advent! 

Tuesday, November 10, 2015

Salted Chocolate Chip Cookies

I have a serious weakness when it comes to a well baked chocolate chip cookie (I am actually eating a cookie while typing. . .ha ha!).  While Nestle Toll House has a pretty good recipe, I have now successfully convinced my husband that it is not the best.  It took close to 6 years trying many new recipes, many of them right here on my blog.  Our absolute favorite is this one.  But, one more recipe has been added to my stack of amazing chocolate chip cookies.

Back in September, when Deb at Smitten Kitchen blogged about these cookies, I stared at the recipe for a few minutes, possibly drooling over the beautiful pictures she posted and knew that I had to make them as soon as possible.  This was one of those recipes that never had time to get pinned to my food board, because they were made almost immediately! 

They were a huge hit to everyone who tried them.  I thought I froze some, but when I went to check yesterday, either we already baked them or they just never made it to the freezer!  I also think I sent them with people as surprise treats. 

This is definitely a recipe that you will want to make. . . probably right now.   If not, you will before you get to the end of this blog post.

Okay.  You might want to wipe that drool off your chin.  I won't tell anyone...it's our little secret!  Now, quick. . . go check to see if you have all the ingredients.  I am sure you do. . . they are pretty basic.  If you don't know where to get chunky sea salt, I get mine for super cheap at Trader Joe's.  I am sure they have it at the regular grocery store with the salt.

I will leave you now with the recipe and happy baking!

Salted Chocolate Chip Cookies
adapted from Smitten Kitchen

 Ingredients:
1/2 cup butter
2 tbsp sugar
2 tbsp turbinado sugar
3/4 cup plus 2 tbsp brown sugar, packed
1 egg
1 tsp vanilla
3/4 tsp baking soda
heaping 1/4 tsp fine sea salt
1 3/4 cup all purpose flour
1 bag of dark chocolate chips
flaky sea salt

Directions:
 Heat oven to 350 degrees.  Line your baking sheet with a silpat or parchmaent paper. 

In a large bowl, cream together butter and sugars until very fluffy. . . this takes about 5 minutes.  Beat in eggs and vanilla.  Slowly beat in sea salt, baking soda, and flour.  Fold in chocolate chunks. 

Scoop into balls and place on cookie sheet.  Sprinkle with sea salt.  Bake for 11 minutes.  You want them to be a nice golden brown, and gooey on the inside.  Let them sit on the sheet for about 5 minutes before moving them to a wire rack. 


Wednesday, November 04, 2015

What's for Dinner? {October Edition}

Confession: I've been in a cooking slump.  The past two months, we've just been so busy that I haven't had time to do any real menu planning.  Between soccer practice and other activities, we've been eating out a lot and eating some of our go-to favorites: Spaghetti and meatballs, paninis, French Dip sandwiches, DIY naan pizza, Trader Joe's Orange Chicken, pancakes, and tacos.  There were a couple of recipes that squeezed into our menu and they were delicious! 

Black Bean Chili
This is a family favorite!  It's even gotten rave reviews at a work chili cook off!  Not only is it delicious, but it is economical, too. . . canned beans are cheap!  This is a great dish to add to your meatless Monday. . . if you do that kind of thing.  We enjoy taking a break from a "Meat" item every week. . . just not on Mondays. 


Roasted Eggplant
So, this really isn't a main dish, but my eggplant decided to bear fruit this fall and we have had quite the harvest.  It's been pretty awesome.  If you sprinkle some balsamic vinegar over the top. . . even better! 

Baked Pumpkin Doughnuts
So, these really aren't dinner.  But, we made them on Monday morning and they were awesome!  Super easy and fun and really, they're baked so maybe less guilt than a real, deep fried, coated in sugar doughnut?

What was your favorite dinner recipe in October?  Link up in the comments.

1 / 2 / 3 

Tuesday, November 03, 2015

Pumpkin Scones

Fall came.  Yesterday.  It came with a great big rain storm that lasted all day and into the night.  Ethan had the day off, and so we hung out in our comfy clothes and snuggled under blankets and watched movies on Netflix.  It was probably the best.day.ever.  Today, I dressed in layers and it was awesome.  So, yes, fall is officially here in Sunny, drought ridden California!  We must celebrate. . . and the only way that really makes sense is to bake something pumpkin-y. 
I realized the last time I made these that I posted about them and just shared the link.  I must have been so lazy back then, because, I really need to have that recipe where I can find it.  It's one of my fall baking traditions.  Everyone loves them!  Weston just wants to eat the frosting, but what 4 year old doesn't?
I made them into squares this time because I've noticed that Starbucks started making them square this year (and I probably spend way too much time in the Starbucks drive thru).  Doing it this way, you don't even need a cookie cutter, you can just cut them out with a knife.  Easy peasy! 

Pumpkin Scones
adapted from here

Ingredients:
2 cups flour
7 Tbsp sugar
1 Tbsp baking powder
1/2 tsp salt
1/2 tsp cinnamon
1/2 tsp nutmeg
1/4 tsp cloves
1/4 tsp ginger
6 Tbsp cold butter
1/2 cup canned pumpkin
3 Tbsp milk
1 large egg

Glaze #1:
1 cup powdered sugar
2 tbsp whole milk

Glaze #2:
1 cup powdered sugar
2 tbsp milk
1/4 tsp cinnamon
1/8 tsp nutmeg
pinch of ginger
pinch of cloves

Directions:
Preheat oven to 425.  Line your favorite baking sheet with parchment or use a silpat.

Combine dry ingredients into a food processor.  Pulse a couple of times to get it all mixed up.  Cut butter into small cubes and add  butter to flour mixture.  Pulse until nice and crumbly.  Slowly add pumpkin, egg, and milk to mixture and pulse until nice and mixed up.  Dump mixture out onto a floured surface.  Sprinkle a but of flour over the top and pat out into a rectangle.  Cut out your desired shape and lay on your prepared baking sheet.  Keep doing this until no dough is left.

Bake for 14-16 minutes.  They should be a light brown.    Cool on a wire rack.

Make glaze #1 in a small bowl.  Using a silicone pastry brush or a small spoon and spread over the tops of the scones.  It doesn't take long for it to become hard. 

Make glaze #2 in the same small bowl.  Pour glaze into a sandwich bag and snip off the tip with your scissors.  Drizzle over first layer of glaze and allow to harden. . . or just dig in and eat.

Enjoy and share some with some friends!  


Wednesday, October 28, 2015

Teal Pumpkin Project {Free Printable}

Can I just vent to you for a bit?  Food allergies suck.  They just do.  As an adult who has had them all my life, I just sort of deal with it.  But, watching my sweet surfer boy deal with allergies has been sad.  It was harder when he was a toddler, because he really didn't understand that he couldn't eat Goldfish or Cheese-its and there were a lot of melt downs because of it.  Now that's he's a little bit older (4 1/2 is so much easier than when he was 2!), he has an understanding that we avoid dairy and soy like the plague in this house.  But, he also knows that we usually have a good alternative for yummy treats (I will post our favorite dairy allergy foods soon), so we don't have melt downs very often.  The thing I dread, though is the sadness he gets after trick or treating and realizing. . . he can't eat any of it.  Guess what?  We just deal with dairy and soy. . . there are kids out there that deal with so much more: fructose, tree nuts, peanuts (which surprisingly is not the same as tree nuts) and many others.  

Last year, I heard about the Teal Pumpkin Project and it got me so excited!  Then I forgot all about it until after Halloween was over.  Mom fail.  This year, I'm kind of on the ball (insert proud mommy face here).  I made a printable (that you, too, can print out), especially if you don't have the time or energy to paint a pumpkin teal.  I don't right now. . . although it sound like a lot of fun!  I also picked up some cool bubbles and erasers from Target to hand out to the kids who have allergies.  Apparently, I am running out  of color ink, so mine didn't print the greatest.  I had planned on having it printed at Office Max, but, I forgot and then ran out of time.  Oops!

You can check out more about the Teal Pumpkin Project here and here

You can print out my sign here.


Tuesday, October 27, 2015

Pumpkin Toffee Coffee Cake

My windows are open.  They sky is overcast and grey and the teeny tiny leaves on our tree are starting to change colors and rain down on our grass (Finally!).  I have even been able to dress my kids in slightly fall clothes (because by the afternoon, they will be back in shorts and a t-shirt).  And my Tuesday morning latte didn't make me break into a sweat.  I am one happy girl!

This is the kind of weather that makes me want to bake everything that I see, especially if it has apples or pumpkins (have you seen my Instagram feed?) and simultaneously sit and sip something yummy while reading a good book or binge watching my favorite show.  It really is a struggle!  Please tell me I'm not the only one.

I also have been feeling in a slump of cooking.  Did you notice that last month's dinner inspiration had only three?  It has been bad.  So, I reserved some cookbooks from the library and I am slowly making a list of things to make next month.  One of the cookbooks I checked out was this one, called Bake it like you mean it, and it's pretty much awesome!  A lot of the cakes are crazy tricky and my kids are begging me to make them (umm. . . probably not going to happen!).  But, one recipe timed it perfect for fall and all the ingredients were in my pantry.  It was like it was meant to be!  So, I baked it and realized I forgot the toffee in the middle, and wasn't going to go back and fix it.  It was still so very amazing.  I think the 'coffee cake' part of the title is just a way to justify eating pumpkin toffee cake with your morning cup of joe.  It was also so pretty to look at. 


Bunt cakes are super fun, too.  They make it look so fancy, with very minimal work.  And then just glazing frosting one and maybe some sprinkles (or toffee) and you have a decadent dessert with very little effort.  I highly recommend Pam non stick spray with flour when you are using a bunt pan.  It has never failed me!  If you don't have it, wipe the inside of the pan down with some softened butter, covering every inch, especially the grooves.  Then sprinkle some flour inside and shake it around, patting the outside.  Dump the excess flour and pour in your batter.  If you are making a chocolate bunt cake, use cocoa powder instead of flour.  That's my helpful hint.  Don't fear the bunt pan.  The bunt pan is your friend!

Now, that I've tormented you with pictures and deliciousness, here's the recipe for you to make.  Now bake away and invite a new friend over for coffee.  

Pumpkin Toffee Coffee Cake
from Bake it Like You Mean It

Ingredients:
1 cup unsalted butter, room temperature
1 cup light brown sugar, firmly packed
1/2 cup honey
1/2 cup maple syrup
3 eggs, room temperature
2 cups pumpkin puree
1 tsp. vanilla bean paste
2 1/2 cup all purpose flour
2 tsp. baking powder
1 tsp salt
2 tsp cinnamon
1 tsp nutmeg
1/2 tsp ground cloves
1/2 tsp ginger
toffee pieces

1 cup powdered sugar
1 tsp vanilla extract
2 tbsp whole milk

toffee pieces

Directions:
Spray bunt can with flour non stick spray.  Set aside.  Preheat oven to 350.

In your favorite mixer, cream together brown sugar and butter until light and fluffy.  Add the honey and maple syrup.  Continue creaming until well incorporated.   Add the eggs, one at a time, mixing well between each addition.  Add the pumpkin pure and vanilla bean paste and mix until all the ingredients are well incorporated.  Slowly add the dry ingredients and mix only until they are well incorporated.

Pour half the batter into the pan and sprinkle a layer of crumbled toffee over the top.  Pour remaining bter and bake for 1 hour.  Cool in pan and invert onto serving platter.

Whisk together powdered sugar, vanilla, and milk.  Start with 1 tbsp and slowly add more if needed.  Drizle over the top and then sprinkled some more toffee over the top.

notes: 
*I got in a hurry and forgot the toffee in the middle.  It was still very good!
* I buy my toffee pieces in the baking section at the grocery store (or Target).
* I ran out of honey while I was pouring, so I topped it off with Karo Light Corn Syrup.  It worked great!  

Enjoy!

Tuesday, October 20, 2015

What's for Dinner {September Edition}

Kitchen catastrophes happen all the time.  We've been living in an epic one in our home and I am praying (I mean serious get on your knees and beg kind of praying)  and hoping that this one would just be over.  It has been like a really bad nightmare that just won't end.  This kitchen crisis caused lots of tears and frustrations like no other.  

Earlier this summer, when we went on our adventure to Oregon, we came home to a rather disgusting infestation of pantry moths.  I threw so much food out and used so much vinegar, but it seemed that they would never go away.  We finally took everything out of the pantry, shelves and all, and vacuumed, wiped down, and repainted and kept all our food out on our kitchen table.  My kitchen has been a disaster for months! Yesterday, I got brave and put all my food back into my pantry and put my kitchen back to normal.  It has been so refreshing to have some order back into my day.   And I haven't seen any moth activity in weeks!  A major happy dance is going on here!

Because of this, the desire to cook has been very minimal.  I do know now that my Oxo air tight containers are completely worth the money!  They never even touched my flours or sugar.  That made my day.  Glass jars. . . not so much!  I learned a lot about what to have in a pantry and soon, I will be sharing some helpful hints on what NOT to do in your pantry.  I should also mention that I've heard a lot of people have been experiencing the same problem.  My best friend was actually dealing with her own case of moths at the same time!  While I wouldn't wish that on anyone, it was kind of nice to know that I wasn't alone!

But first, some of my favorite dinners from September.  There aren't that many because a lot of what I cooked were repeats of the previous months.  There wasn't a lot of experimentation because. . . well. . . I couldn't find anything in my kitchen.  

Oh, and I should mention that I've been doing a lot of grilling.  I'm kind of lazy and it's just one more pan I don't have to clean up.  Plus, it makes dinners so easy!  Feel free to share what you've been cooking in the comments.  I am always looking for new recipes!

1.  Pioneer Woman Pollo Asado
 I made this a few weeks ahead of time and froze it in the marinade.  The meat was perfectly tender and everyone loved it!  Definitely making this again!


2. Balsamic Honey Chicken Skewers
I've made this a few times lately because it's a simple recipe to freeze and save for later.  This will probably become a regular recipe on my menu plan. 


3.  BBQ Chicken
This recipe was like non I've ever made before.  I kind of found it by accident one day because I had thighs to cook and not a lot of ingredients since it was the end of the month . . . and well, my kitchen was ick!  This one won't be a good freezer meal because you marinate the chicken in mayonnaise, onion slices, and some other stuff for a few hours before you get it on the grill and start putting the BBQ sauce on it.  We used Sweet Baby Ray's because  that's our favorite and that's what we in the fridge.  I've made this twice already. . . it's so good! 


1/2/3

Wednesday, September 30, 2015

Lunchtime inspiration

  
School lunches can be a bit intimidating.  Especially, when you see pictures of ornately cut sandwiches daintily painted with food paint, everything following a special theme.  The idea of making a lunch can seem downright overwhelming at times, especially with kids.  They are picky eaters, they are starting to develop their own likes and dislikes.  Sometimes, it's just easier to throw a couples of dollars at them on their way out the door for them to grab something at school.  

At our house, we are BIG on knowing what our kids are eating.  We don't care about their calorie intake and we don't let anti-obesity rules dictate what my kids eat (yes, it's a problem, but we are not going to develop eating disorders in our children).  We eat lots of fresh food, limit the processed foods, and enjoy treats every now and then.  We also know our children and their needs for nutrition and what makes them thrive.  For example, Ethan needs protein.  A chocolate milk, cheese, or yogurt can instantly take him from grouchy and tired to happy and focused.  Because of this, his lunches often have at least one or two sources of protein. We rarely buy boxed drinks and just fill up Contigo cups with water for the day to drink. 

We also focus a lot on variety.  I don't spend a ton of money on lunch stuff because it's mostly things we have in our fridge or around.  I posted pictures to instagram the first two week of school and each lunch was different (you can find me here and #klassenlunches).

Also, we use Bento styled containers so that when they are eating, everything is in front of them at once.  It also limits plastic bags and trash, which is great, but what I found is that more gets eaten from these containers than when I just send bags of food.  I can also easily see what got eaten at school that day and what didn't.

Here are some helpful hints to make lunches easier:
* Don't spend more than 5 minutes making lunches, you will end up dreading and hating it!
* Try to make it different every day.
* Make a list of their favorite foods and try to incorporate them in their lunch.
* Let your kids help pick out new lunch items and test drive them at home (this summer, we picked up a Weelicious cookbook at the library and tried some out. . . some were great and some were flops!).
* Our favorite lunch containers are these.  This year we also added these and these and really like them.  This one fits perfectly into our lunch pails because we use pottery barn kids lunch pails, too.
* We also use Wilton silicon muffin liners and dip containers to keep foods from leaking.
* cookie cutters are a fun way to make sandwiches a bit more fun

Here are some of our favorite lunch ideas:
Turkey, cheese, and crackers
Hummus and Pita chips
snap peas, grape tomatoes, carrots, cucumbers
ranch
naan pizza
nutella roll ups
bagel and cream cheese
pancakes
granola bars
pretzles and peanut butter
string cheese
Wheat Thins and Laughing Cow or Boursin cheese
yogurt
fruit
apple sauces
Turkey and Cheese on Hawaiian bread
PBJ's
Honey Peanut Butter and crackers

I hope that this helps get you started or get you our of a rut!  It doesn't have to be difficult or crazy, as long as it's healthy and the kids eat it. 

Monday, September 28, 2015

Cranberry Vanilla Bean-Almond Oatmeal

Breakfast is the most important meal of the day, but I will be honest with you.  It's the hardest one for me.  I try really hard to eat something every morning, but there are mornings that it just gets skipped.  Oatmeal tends to be one of my go-to breakfasts when I have a little bit of time in the mornings, especially after a nice, long walk. 

I have always liked oatmeal.  I remember begging my mom to get the Quaker instant packs as a kid (the blueberries and cream was my favorite!).  Somehow my love of oatmeal did not get passed down to my kids (unless in cookie or granola bar form).  Super sad face.  We don't buy them anymore  because they have all sorts of yucky things in them.  And, it's really not that hard to make it yourself (trust me. . . multi-tasking is perfect for oatmeal making!). 

So, last week, when I couldn't find the raisins, I just started working with flavors.  And trust me. . . it's pretty awesome! 

What's your favorite breakfast?  Comment or add your link in the comments!

Cranberry Vanilla Bean & Almond Oatmeal

Ingredients:
1/2 cup oatmeal (not Steel-Cut)
1 cup water
handful of dried cranberries
brown sugar, to taste
Cinnamon, to taste
1/2 tsp vanilla bean paste
1/4 tsp almond extract
Vanilla almond milk
slivered almonds

Directions:

:: Bring water to boil in a small pot.  While that's going on, toss in your cranberries so they can plump up while you are waiting.  Add oatmeal and stir.  Let sit for a minute or two until done cooking.  Add sugar, cinnamon, vanilla, and almond extract to oatmeal and give a nice little whirl with a spoon.  Pour into your favorite cereal bowl.  Sprinkle oatmeal with slivered almonds.  Pour some vanilla almond milk over the top and eat. 

note: I tend to be a bit generous with my sugar. . . it's a problem, I know.  I usually use between 2-4 tablespoons. . . don't judge. :)


Friday, September 25, 2015

Pizza Rolls


This is not the greatest picture.  I hope to replace it soon with another, but I keep getting asked how to make these pizza roll-ups, so I wanted to get a post done and I when I made a quick batch up last night, I didn't take any pictures until it made it into his lunch.  Again, I apologize!

I have made different versions of this over the years, but it's a great quick lunch recipe that's great hot or cold or great for a quick party treat.  I made these up for Ethan's 7th birthday party and they went quick!  Last night I made them for Ethan's lunch and they were eaten and then he asked for more when he came home for a snack!  

So, until I can remember to get the recipe pictures done, here's the rundown:

Pizza Rolls

Ingredients:
1 crescent roll pkg
pizza sauce (we like the Trader Joes refrigerated kind)
pepperoni pieces (we found Hormel minis worked out perfect!)
mozzarella

Directions:
On a cutting board, lay out the sheet of crescent rolls.  It should be one big rectangle.  Use your fingers to push the seams together.  Use a pastry roller to spread out a little, if you want. 

Spread sauce lightly to cover the rectangle.  Sprinkle mozzarella and pepperoni over it.  Roll up like a cinnamon roll and cut into slices about 1 inch think.  Place in greased baking dish and bake at 375 for about 15 minutes.  

Notes:
:: Good cold or hot!  They make great lunches!
:: If you need to make a non dairy version, the Daiya Mozzarella shreds are awesome!  I actually do it with them and no one notices the difference!

Wednesday, September 23, 2015

Ethan turns 7 and his painting party

I'm not really sure when it happened, but my first born went from being an active little toddler to a boy.  I feel like I blinked and it happened.  There are days when I really just miss those days. . . they were a little simpler and there were naps.  Man, I really miss nap time.   But, I digress.  He's officially 7 and had his first party where he got to invite a few friends from school and church.  It ended up being an incredibly busy day and if it hadn't been for the smokey/ashy air from the Rough Fire, he would have been a little late to his own party due to soccer (all games were cancelled because it of super poor air quality and raining ash).  It worked out though and it was a wonderful celebration of our sweet boy!  

This year we chose the fun theme of painting! We went with bright rainbow colors and just had fun with it.  There were so many things I wanted to do with this theme, but just didn't have the time for.  My very wise husband kept reminding me that no one else would notice. . . he's pretty much right! 

Ethan's party was at 10, because in our neck of the woods it is still VERY hot!  California does not get the memo that fall is coming.  I didn't really want to paint in the house, so in order to paint outside, we needed to do it early.   We still did a lot of candy, because a.) why not? and b.) the colors are perfect for a painting party!  We chose skittles, birthday cake M&Ms,  and lolly pops that I found at JoAnns with a half off coupon (score!). 
You can't tell by the picture, but underneath the yummy marshmallow buttercream frosting (recipe to come soon!), the cake is rainbow.  We went with the Duff Tye Dye cake mix that we found at Target (man, I love target!). 
To paint, we moved outside and stayed underneath the patio because it was really raining ash!  Each kid was able to paint their own canvas to take home.  We used painters tape and did block painting.  They turned out super cute!  I also had water color paper and water colors for them if they wanted to paint some more.  Everything turned out soooo cute! 

Aren't these paintbrushes awesome!?  IKEA for the win!  I bought a ton of them when we were there this summer! 


Here is Ethan and his best friend Abi.  Ethan was very diligent in making squares with his painters tape.  Abi made an A with her painters tape and check out how cool it came out!  I really love the little paint pallets I picked up at JoAnns (also with a coupon!). 

 We really did have a 7. . . I bought it!  We used it at the Beach House on his birthday, but I don't think it made it home with us.  So, my husband improvised. . . good thing I didn't throw away Weston's candle from this party!

And that's pretty much Ethan's party. 

 A big thanks to my best friend at Epiphanie design for taking pictures for me so I could focus on our guests!  I don't know what I would do without her!


Thanks for stopping by! 

LinkWithin

Related Posts Plugin for WordPress, Blogger...