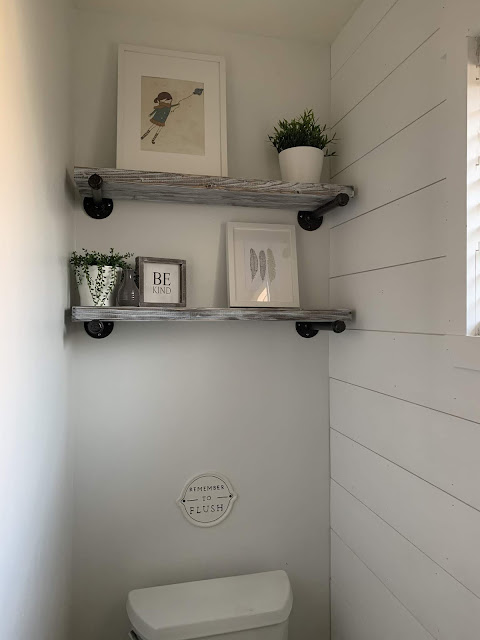
I have been dreaming of making shelves out of industrial pipes and when Jon said he was going to build me some shelves. . . I got a little worried. But, it turned out that he had the same idea and so we went for it.
After the Christmas rush was over, we hit up our local Home Depot and found all the piping. We had to ask someone to tell us where it was, because it's not something we've had to buy before. I'm pretty sure the guy who showed us where it was laughed at us because we were going to make shelves. To be honest, I am sure he was annoyed that we weren't doing some actual piping. Oh well. . . being a Pinterest junkie and diy-er sometimes gets you weird looks. It's all good though because they came out gorgeous! We bought 4 10in rods, 4 ends and 4 of the screw do-dads (I'm sure that's the official word. . . ha!) that hold the rod and screw into the wall. One thing we learned right away is that you can't assume they are all the same. Some were made in China and some in Indonesia and suprisingly the holes that the screws go in are not in the same place. . . they are slightly different. So, do yourself a favor and don't buy 2 of each from different countries. . . don't be like us. . . be better.
We bought some Rustoleum metalic spray in the color bronzed copper and got right to work spray painting them. We chose that color because it was the closest thing to our faucets and fixtures and also because it protects them from the moisture that comes from regular shower taking. We sprayed each piece individually and let them sit for a few days until we got to work on the next phase of the project.
Once we got some wood, I headed over to Lowes and picked out the straightest, prettiest piece of wood I could find. It was actually more difficult than I expected because I'm short and this wood was stacked taller than me. Some nice man had pity on me and came and helped and then cut the wood into the right lengths for me. Seriously, the best part is they cut it for you! One less thing to worry about!

 I headed home and the next day started the staining process. I used espresso first, let it dry and then stained it with a classic grey stain.
 After the stain was dry, I grabbed some white paint and stirred in a little bit of water. Then I lightly painted it over my stained wood. I wasn't going for full coverage, I just wanted some white. I let that dry over night to make sure it cured.
And then, the wood got to hang out in the garage, while I went crazy with a piece of sand paper. I'll be honest with you, at this point I thought maybe. . . just maybe. . . I messed up. I really wasn't sure I liked it. But once I got it on the shelves, I fell in love. They worked perfectly for the space. Sometimes, you can't judge a project until it's done. The cool thing with shelves is that you can just take an electric sander and sand it down and then start staining all over again with different stains until you get it right.
I just love how they all came together! I raided Ikea on the way home from Disneyland and got some of their plants and some picture frames. . . you can't beat their prices. The rest of the stuff came from stuff I had lying around and free printables compliments of the wonderful bloggers who post things to Pinterest. I still think it needs one more thing and when I find it, I'll move things around. But, for now, I am content with the way things look.
That's all for now. Here's a few details just in case you want specifics.
Resources:
:: I loosely followed this blog post.
:: I used Varathane classic gray and espresso stains (Home Depot). Lowes has a different brand, but same color names. All are under $5.
:: White paint was Sherwin Williams White (not tints or mixins added).
:: "Don't forget to Flush" sign is Hand and Hearth for Target.
Previous bathroom re-do posts:
front bathroom update
Bathroom Cabinets update


No comments:
Post a Comment
I love hearing your comments and feedback. . . It makes my day!!!