Friday, December 31, 2010

Bean Bags Crazy

I went bean bag crazy this year. I had a vision in my head and set out to work. . . in order to make some fun gifts for my nieces and nephews for Christmas. Even better was seeing the kids faces get excited when they saw them. . . and then watching the bean bags fly across the room (fun for even the daddies!).

These small ones were made specifically for the newest arrival of the Klassen clan. . . Mr. Braden. I made them out of different orange and blue fabrics and ribbons. The backs are made of various textured fabrics (i.e. chenile, softy stuff, and felt). I liked these for the little guy because he can stack them or just play and shake them.

For the girls. My niece, Zoe, helped pick out this fabric. It made the cutest bean bags and bags. So nice and girly!

Rocket Scientist. . .

Trains, puppies, and mushrooms!

So much fun in a bag!

Wednesday, December 29, 2010

Cranberry Eggnog Muffins

Okay, so I have never made so many recipes from my Food Network Magazine, and the December issue I have made at least one thing a week. . . sometimes two. I am quite proud of myself. . . really I am.

This recipe just sounded good. I like egg nog. . . okay, I like Silk nog. It's completely egg and dairy free, but it still has this rich, creamy taste that is just delightful (thanks Steph for introducing me). This recipe gave me the perfect excuse to buy a container. These muffins came out incredibly moist and delicious. Even my husband, who strongly dislikes eggnog (due to the egg factor) gobbled these up each morning for breakfast. . . willingly. (it may have had something to do with the fact that I used the Silk Nog, instead of regular eggnog).
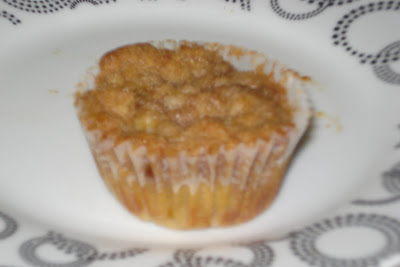
Charlie's Cranberry Eggnog Muffins
Food Network Magazine, Dec. 2010

Ingredients:
1 cup dried cranberries, roughly chopped
1/2 cup apple juice
2 1/2 cups flour
2 tsp. baking powder
3/4 cup packed light brown sugar
1/2 tsp. salt
1 stick unsalted butter, melted
1 1/2 cups eggnog
2 large eggs, at room temperature
1 tbs vanilla extract

Topping:
1 1/2 cups flour
1 1/2 tsp cinnamon
1/2 tsp nutmeg
1 1/2 sticks unsalted butter, melted
3/4 tsp salt
1 1/4 cup packed light brown sugar

Directions:
:: Preheat oven to 375 degrees.
:: Warm cranberries with apple juice in a small saucepan over medium heat. Remove from heat and let steep for 5 minutes. Drain.
:: Whisk the flour, baking powder, brown sugar, and salt in a medium bowl.
:: Whisk together the butter, eggnog, eggs,a nd vanilla in another bowl. Gently fold in into the flour mixture, but don't over mix. Fold in cranberries.
:: Divide batter among the muffin cups.
:: Make the topping by combining the ingredients eith yoru fingertips until it looks like wet sand. Sprinkle generously over batter.
:: Bake for about 30 minutes.

A quick peppermint treat

I needed a quick and inexpensive gift for my MOPS steering team. . . they do such an amazing job, that I really wanted them to feel loved and appreciated. I really think hot cocoa is such a fun gift, because most people really enjoy a nice cup of hot cocoa on a cold, rainy evening (and we've had quite a few of them lately).
Hot cocoa, a chocolate bar, and marshmallows.

For the marshmallows, I dipped them each in melted white chocolate and then again in crushed candy canes. After they had set, I placed them in their gift bags.


Monday, December 13, 2010

Gingerbread Week: Part 2

Last week, we were just swimming in gingerbread. . . it was awesome! So, my pictures are way out of order, so bear with me. . .

Ethan had so much fun helping decorate the cookies with homemade Royal Icing.
He even got to put sanding sugar on some of them. . . he loved that, too!

Royal Icing Recipe:
1 egg white
1/2 tsp. lemon juice
1 3/4 c. confectioners sugar

Beat egg whites and lemon juice until foamy and then add sugar slowly. Beat until stiff peaks form. While using, keep covered with a damp paper towel. Use a baggie, cutting a small hole in corner of bag to decorate.


Rolling out the dough. . .

Molasses. . . an important ingredient (we went through almost 2 bottles last week!).
Our cookie recipe came from this month's Food Network Magazine. . . they turned out delicious!

Here's the recipe:

Ingredients:
3 1/2 cups flour
1 tsp baking soda
1 tsp salt
1 tbs ground ginger
2 tsp cinnamon
1/4 tsp ground cloves
1/4 tsp allspice
6 tbs melted butter
1 tbs melted shortening
2/3 cup light brown sugar
3/4 cup molasses
1 egg

Directions:
Sift together dry ingredients. Combine melted butter, sugar, molasses, and egg. Beat with electric mixer. Beat in flour mixture in 2 additions. Divide the dough in half and wrap in plastic and chill for at least 2 hours.

The finished product! It was a family affair and we had a blast!

Friday, December 10, 2010

Gingerbread Week, part 1

Gingerbread week got off to an awesome start! At the beginning of the week, I always try to make some sort of breakfast treat that is easy for Jon to grab on the way out the door. (I will confess that I have been really bad lately). So, this week, it just made sense to make something to go along with our gingerbread week, so gingerbread muffins we had. I will mention that they were delicious and did NOT last very long at all. Even Ethan gobbled them up rather quickly!

This recipe came from Taste of Home and recommended a lemon curd recipe to go along with it. I honestly wasn't so sure about the lemon and gingerbread combo. . . so I didn't make the lemon curd. You can find this delicious recipe here. I will also note that this recipe was one of their award winners. . . and it was a winner in our family!

Enjoy!

Wednesday, December 08, 2010

Toddler Time: Christmas Trees

Last week, we kicked off the first week of December by decorating our tree and doing an assortment of Christmas Tree crafts. I don't have pictures of all of them, but I will do my best to give easy instructions, and maybe I will get some pictures taken and add them later.
:: Paper Pieced Christmas Tree
Materials: Scrapbook Paper. . .construction paper. . . glue. . . scissors and/or paper cutter

Directions: Cut a triangle out of 1 or several pieces of scrapbook paper. If you want your pieces to be all different, you can cut them out of different pieces. I only used one piece of scrapbook paper, and cut a triangle out of it and then split it into several pieces. We talked about big and small, and we glued them on. I also cut out a star from some yellow construction paper scraps and had him glue it on the top.

:: Sticker Ornament Tree

Materials: Construction Paper, Green Christmas tree (out of construction paper), Yellow construction paper star or sticker, assorted stickers, glue

Directions: Choose a color for your background to glue the rest of your stuff on. Cut a Christmas Tree out of green construction paper. Have your child glue it to your background piece. Then give your child stickers and have them stick them anywhere on the tree for ornaments.

:: Foam Ornament Tree

I bought a pack of foam ornament kits at the Dollar Tree here in town. It was great, because it was 3 for 1 dollar! Super easy craft that Ethan loves to do. But, you can get them at Michael's or order them through Oriental Trading Company.


We are having so much fun filling our day with these fun activities. I can't wait to show you all our Gingerbread week stuff.


Friday, December 03, 2010

A Klassen Family Tradition

Family traditions are something that Jon and I really have tried to establish since our wedding. Despite spending our holidays with each other's extended family, we really enjoy having our own little Thanksgiving. It is something we have striven for each year. Last year, was the first year we didn't do it, because a lot of my kitchen stuff had been packed up. I think this year, was my favorite year! Ethan even enjoyed his first taste of sparkling cider and ate very well!

So, here's a peak of our Thanksgiving dinner.

Our deliciously moist turkey!
I am a big fan of the turkey bag because it cooks in less than 3 hours and turns out so moist. This year, I rubbed it with an olive oil and rosemary herb rub, both under the skin and above the skin and inside the cavity. I also added orange and lemon wedges into the cavity to add additional moisture to the turkey. It had the most delicious flavor!
The Stuffing:
I will confess that my favorite stuffing is my mom's sage stuffing. It's amazing. But, she was at her annual gathering at the coast and wasn't even making it this year. Plus, she has the recipe memorized that I can't figure it out. But, my sister in law made some delicious stuffing for the actual day, so I borrowed her recipe and it was so good! I sauted onions, garlic, shallots, and celery with some olive oil and added them to the Trader Joe's stuffing mix and seasoning mix and then baked it in the oven for about 30 minutes.

mmmm. . . Mashed Potatoes
These are my traditional go-to mashed potatoes. I boil red potato chunks in salted water until just soft enough that a fork can pierce through the pieces. I don't take off the skins at all. . . they give the extra color and flavor. Then I put them in a mixing bowl and add some butter, heavy whipping cream, garlic powder, salt, pepper, and Italian seasoning. I am really not sure of the measurements, because it is completely to taste. I then use my hand mixer and whip them up till they are soft and creamy.

The salad
Spring Mix, candied walnuts, cranberries, and dried apples tossed with raspberry hazlenut vinegarette. So yummy, I could eat this every day! It's even great with spinach.

I also made cranberry sauce. . . it was super good.

The cheesecake. . . pumpkin of course!
This was left over from the cheesecake I made of turkey day. . . we just finished it off!

Thursday, December 02, 2010

warm fall goodness!

Several weeks ago, we went to Sweet Tomatoes for a yummy family dinner to celebrate Jon's mom's birthday, as well as mine. It was a fun time! But, one thing they had there was a seasonal apple cranberry cobbler - one that Jon couldn't get enough of. So, a few days later we noticed the apples probably needed to be made into something. . . and we had enough fresh cranberries lying around that we could probably make some sort of yummy concoction that would be similar to the one at Sweet Tomatoes.
Fortunately, one of the first recipes I found was this one, which I had all the ingredients for. It didn't take long to make and it turned out so yummy! This is definitely a keeper in the Klassen recipe box!

Cranberry Apple Crisp with Oatmeal Streusel Topping

Ingredients:
  • 1 cup (packed) golden brown sugar
  • 1 cup old-fashioned oats
  • 3/4 cup all purpose flour
  • 1/4 teaspoon salt
  • 1/2 cup (1 stick) chilled unsalted butter, cut into pieces
2 12-ounce packages cranberries
  • 1 1/4 pounds Golden Delicious or Fuji apples (about 3 medium), peeled, cored, cut into 1/2-inch cubes (I used 3 Jonagold and 1 granny smith and it turned out fantastic!)
  • 1 1/2 cups sugar
  • 2 tablespoons apple juice or cider

Directions:

:: Combine brown sugar, oats, flour, and salt in large bowl; toss to blend. Add butter and rub in with fingertips until mixture comes together in moist clumps. Cover; chill while preparing filling. (Topping can be prepared 1 day ahead; keep chilled.)


:: Preheat oven to 375°F. Generously butter 13x9x2-inch glass baking dish. Combine cranberries, apples, sugar, and apple juice in heavy large pot. Bring to boil over medium heat, stirring often. Boil until cranberries are tender and juices thicken slightly, about 5 minutes. Transfer filling to prepared dish. Sprinkle topping over.


:: Bake crisp until filling bubbles thickly and topping is crisp and deep golden brown, about 40 minutes. Let cool 10 minutes. Serve with ice cream.


Wednesday, December 01, 2010

Salted Chocolate Peanut Butter Cookies

I honestly don't think my obsession for cookies will ever end. . . I keep finding amazingly, wonderful recipes to try out. It drives my husband crazy, because he is perfectly content with the basic Nestle Toll House recipe.

I also haven't been very quick to jump on the bandwagon of salting my chocolate treats. It seems to be a big baking craze. You can even find salted dark chocolate candy bars in the high-end candy bar section at stores like World Market. But, this recipe, I just HAD to try. . . it sounds delicious. Not to mention, peanuts add just a touch of salt anyway. My husband thought I was strange for sprinkling salt over the tops of my dough mounds before baking them, but they turned out so great. Apparently salt + chocolate = extra sweetness! Who'd have thought?

Salted Chocolate Peanut Butter Cookies

Ingredients:
1 1/4 cup flour
1/2 cup cocoa powder
1 tsp baking powder
1/2 tsp baking soda
1/2 tsp salt
1/2 cup unsalted butter, at room temperature
2/3 cup light brown sugar
1/3 cup granulated sugar
2 eggs
2 tsp vanilla extract
1/2 cup peanuts
1 cup semi sweet chocolate chips

Directions:

:: Preheat oven to 350 degrees. Line baking sheet with your favorite silpat or handy dandy parchment paper.

:: Whisk together dry ingredients (flour, baking powder, baking soda, salt, and cocoa) in a medium bowl. Set aside.

:: Beat together peanut butter and both sugars in your mixing bowl until light and fluffy. Add eggs one at a time, beating well with each addition. Add the vanilla extract. Add the dry ingredients until just mixed in. Using a rubber spatula, stir in peanuts and chocolate chips.

:: Drop rounded spoonfuls (I use my cookie scoop) and sprinkle with coarse salt. Bake for about 12 minutes. Let the cookies cool on the cookie sheets, before moving them.

Happy Baking!

Friday, November 26, 2010

Happy Black Friday!

Thanksgiving time is quite possibly one of my favorite holidays. . . just family getting together to eat, laugh, talk, and eat some more. You don't have to worry about buying gifts or anything. Maybe that's why the retail industry just sort of skips right over this holiday centered around turkey and thanks!

One of my absolute favorite desserts is Pumpkin Cheesecake. I recently made the marbled cheesecake bars, which was fantastic and super easy. But, I have never, ever made a real, hard-core cheesecake. I really wanted to see what all the fuss was about. I know so many people who have mentioned their fear of baking cheesecakes (not including the Jell-o no bake box mixes). And overall, the entire process wasn't that bad. Yes, there were some strange steps, but if I didn't do them there would be way too much moisture or a ton of cracking. It was definitely worth it to bite into a soft, perfectly textured pumpkin cheesecake on Thanksgiving day!

Here's a few of my observations from my experience:
:: This was my first water bath experience. I don't have a roaster, so I filled my cookie sheet with edges up as far as it could go and that worked great. I had always wondered why this was done, so I did a bit of research and discovered that it helps prevent cracking. Nobody wants a cracked cheesecake, right? I was super excited because even though I didn't have a roaster, it still worked and only cracked a little tiny bit.

:: Pumpkin - Pumpkin is filled with LOTS of water. With any other dessert, you don't usually have to squeeze the water out of the pumpkin, but with cheesecake you don't want it all watery. It was a bit time consuming, but completely worth it. I used paper towels and just squeezed and squeezed until the pumpkin looked very dry, which felt really, really wrong at the time. However, the cheesecake turned out amazing!

I found the recipe over here. I have been baked several things from this blog and her recipe that she came up with turned out really awesome! I didn't do the pecans, but I think when we eat it tonight, I will make my homemade whipped cream to make it extra special. Or . . . perhaps, drizzle a bit of chocolate syrup over the top of it.


Tuesday, November 23, 2010

mmm! Pumpkin!

I just can't get enough pumpkin! I really think Fall is my favorite time of year because of pumpkin alone (although, I am mesmerized by the amazing colors of the changing leaves!). I made these bars a few weeks ago, when we hosted our small group Bible Study. They were quite yummy, I must admit. . . but can you really go wrong with pumpkin. . . and cheesecake?

Marbled Pumpkin Cheesecake Bars

Ingredients:
2.25 cups crushed gingersnap cookies
3/4 cup chopped pecans
1 stick (8 Tbsp.) unsalted butter, melted
2 (8 oz.) packages cream cheese, softened
3/4 cup granulated sugar, divided
1 tsp. vanilla extract
3 eggs
1 cup pumpkin puree
3/4 tsp. ground cinnamon
1/4 tsp. ground nutmeg
1/4 (heaping) tsp. ground cloves

Directions:
Preheat the oven to 350 and lightly grease a 9×13 baking pan. In a large bowl or in your food processor (which is what I use, since I already used it to crush the gingersnaps), combine the gingersnaps, pecans, and butter. Press into the bottom of the prepared pan and bake for 10-12 minutes. Set aside to cool.

In a medium bowl or in your stand mixer bowl, mix the cream cheese, 1/2 cup sugar, and vanilla just until smooth. Mix in the eggs one at a time, blending after each addition. Set aside one cup of the mixture. To the remaining mixture, mix in the 1/4 cup sugar, pumpkin, cinnamon, nutmeg, and cloves.

Spread the pumpkin batter into the crust. Drop the remaining plain batter by spoonfuls onto the top. Swirl with a knife to create a marbled effect.

Bake for 25-30 minutes or until filling is just set (the middle will still jiggle a little bit). Cool the bars in the pan and chill in the fridge for at least 4 hours before serving (I stuck mine in the freezer for about 2 hours and then took it out a couple minutes before and it was perfect).

Happy Baking!!!!

Toddler Time: Thankful Tree

Thanksgiving is just two days away. . . I can't believe it! One of biggest annoyances is Christmas music BEFORE Thanksgiving. And, to make matters worse, this year, retailers started promoting Christmas as soon as Halloween was over (if not before!). Sadly, in a retail based society, we tend to want, want, and want. I confess, there are tons of things I want (and can't have), but I really wanted to start the season of THANKFULNESS teaching my son (who is 2) about being thankful. So, we made a thankful tree.
This project took 3 days, because the first day we traced everything (so I could cut them out), and then we glued everything down, and then when it was dry, we wrote what we were thankful for. I will remind you that I have a 2 year old, so the attention span is not that great, so breaking up art projects for smaller kids is a great idea and helps them keep their focus. It also doesn't take that much out of your day in order to do it.
We had so much fun doing this craft! I look forward to doing it again each year and seeing how the things he is thankful for changes as he gradually understands the concept of thankfulness more each year.

I also have some other thanksgiving crafts that I am just not sure I am going to get posted in time for thanksgiving. . . but you can Google preschool thanksgiving crafts and tons (I mean TONS) of ideas will pop up.

What kinds of projects have you been doing with your toddler or little one? Please comment, I love hearing what you've been up to!

Monday, November 22, 2010

Just in time for Thanksgiving breakfast

Oh my goodness! I have so many things to post, so I apologize ahead of time for the abundance of pumpkin. . . I just can't get enough of the stuff this time of year. I have seen so many other bloggers posting about the combination of cinnamon rolls and pumpkin. . . I just couldn't resist the temptation. And let me just say, they were delicious and didn't last long!
I found so many different recipes on the greatest recipe book on earth (a.k.a. the world wide web) and finally chose on this one. It is apparently a recipe from Cooking Light, but I will confess, I am not sure what was "light" about it. . . but it sure was good!

I was also able to take the portion of the recipe for the bread and put it into my bread maker and let it do all the work in making the dough.

You can go HERE to check out the recipe. . . it's delicious. If you make them, let me know what you think.

Also, what are you making for Thanksgiving? Have a great night!


Friday, November 12, 2010

A great way to save money.

I am constantly looking at how I can help save our family money. This week, my husband and I sat down to make our annual Christmas budget and I realized I needed to get creative in how I spent the money we had budgeted. I have been spending a lot of time looking for the best deal on Christmas Cards and found (through another friend's blog) that I could get some of my Christmas cards for free. . . don't worry, you heard me right. . . FREE. Now, I am not talking about 5 or 10 free cards, I am talking about 50. I am so excited that I want to go and take my family pictures now. . . except, I don't have Ethan's Christmas outfit picked out yet (that's my only problem).

Anyhow, I haven't decided which card I want, but I really like that they have different formats and layouts for several different pictures (I always have trouble picking out my favorite one throughout the year, so the layouts with several pictures have me incredibly excited! You can look at their beautiful selection here. I also like the option of their New Year's cards because I am always running late with getting them out. No matter how early I start, I always procrastinate mailing them out or get distracted with some other project. If I need to, I can just pick a New Year's card and pretend I planned it all along. And now that we're having our second little bundle of joy pretty soon, I am really lovin' their wall art. So simple and neat for this little baby's newborn pictures. So many ideas, so many different ways to present it all from one website. How cool is that?

I hope that my fellow blogger friends take advantage of this amazing deal. Bloggers get 50 free holiday cards from Shutterfly… sign up here.

Wednesday, November 10, 2010

Toddler Time: Indian Corn Activity

I am having so much fun getting my craft on with my toddler! I keep finding all sorts of really neat activities to do, that I am not going to have time to do them all. But, that's okay - because I need to leave some activities for next year, right?

Now that Halloween is over, and November is here (despite the plethora of Christmas stuff out in the stores), we NEED to be focusing on Thanksgiving with our kiddos. I think so often we forget about this great holiday that really isn't focused on anything but spending time together and eating scrumptious food.

So, here is a button Indian Corn craft that is just way too cute!!!! (at least I think so!).


Step 1: Go here to get template and print out.
Step 2: Trace the pieces on colored paper and cut out (unless you feel comfortable with your toddler using scissors, I recommend this as the mommy job).
Step 3: Gather your child, glue, and buttons (I have jars of color coordinated buttons, but you can find a great little bag of them in the right color scheme at JoAnns).
Step 4: Help your child glue the pieces together. Then turn over so that the layering is on the back.
Step 5: Have child show you where they want to put the button. Place glue there and have them place button on glue.
Step 6: Continue until you think they are done
Step 7: Place in a safe place to dry and then display so child can be so proud of their work.

Happy crafting!

P.s. if you have ANY questions, please feel free to comment . . . i will get back to you as soon as possible!

Tuesday, November 09, 2010

Robots and Love

This weekend, I got to help celebrate the upcoming birth of a friend's first. She's having a boy and the party was full of Dr. Seuss (Debi did a great job!). I just love making baby stuff. . . each gift I make ends up being just a little bit different then previous gifts, which makes it kind of exciting!

For this round of baby gifts I had found a half yard of Michaell Miller's robot camp fabric on sale at the Cotton Ball in Morro Bay several months ago and needed something that would accent it nicely. I thought that the blue with green circles fabric from Amy Butler's line, Love, would be perfect! I had so much fun putting these things together!
I cut a square and used Heat & Bond to adhere the robot onto the shirt and then blasted it. It's just a simple shirt, but it really made the gift go together (at least I thought so).
For the Bib, I added some scraps from Heather Bailey's Nicey Jane Line. . . similar colors to tie everything together.
The diaper pouch gave me a slight scare, because I forgot to put the elastics in it for the button (which is the very first step. . .grr!), so I used sew-able velcro. I really like the way it turned out. Now I just need to find some labels to put on my creations. . . any thoughts?
Chenile burpies. . . one of each fabric. So soft and snuggly!
And a quick card that I almost forgot to make! Ooops! This card uses Stampin' Up's Gable Green and Bashful Blue inks and paper. The square eyelets are also SU, but Brocade Blue (they were close enough and I was in a hurry!). The stamps and printed paper are also Stampin' Up.

Have a great Tuesday!

Saturday, November 06, 2010

Toddler time!

Okay, so I mentioned the other day that I was going to be making some changes to my blog and adding some new dimensions. A lot of this has to do with the teacher in me, but mostly because I really want my two year old to have some amazing experiences that really help him to grow into the man that God created him to be. Art activities are so important to the growth and development of a child that I just can't not give these opportunities to my child.
Another reason is that I want to give my fellow mamas out there some quick and easy activities they can do with their own kids without having to spend hours searching for things and having to run out and get the supplies needed or spend an arm and a leg to do it. As MOPS coordinator this year, I really want to give something to my fellow MOPS mommies that might help and encourage them.
One of the great things about doing art projects with toddlers is that it really helps divide up the morning. I choose a morning that we don't have anything going on. . . usually Wednesday. Right now, I am working on thematic projects because we are in the midst of so many fun holidays.

My first project is kind of belated, because we did this last week for Halloween. But, it turned out so cute that I had to share. Plus, I will start a page just for Toddler Time stuff, so it can easily be found next year when looking for something fun to entertain/stimulate
your little one with.

Paper Plate Jack-o-Lantern

This project was a two day project. On day 1, I got my kiddo in just his diaper and let him finger paint the back of his paper plate orange. He was surprisingly clean. I used the Crayola washable finger paints. . . they are awesome and wash off so nicely! Because the weather was cooler and finger paints are thick, it took awhile to dry, so we just finished this project the next day.
I cut out some eyes, a nose, and a mouth out of construction paper and showed them to Ethan. We talked about where those parts are on our body. I showed him what we were going to do with the eye and glued it on for him. Then, he showed me where to put the glue for the next eye and he put it on himself. We did this with all the rest of the face.
After he was done, he was so excited to tell me all the parts on his pumpkin's face. This is him saying "Nose," in his own cute way. I love it!

He was so proud of his creation, he didn't want to hold it up for me to get a picture. He wanted to keep looking at it!

Happy Creating!

Wednesday, November 03, 2010

yep! There's more

A little teaser pic of what's ahead. . .
taken fresh out of the oven. . . mmmm. . . good!
I am going to try to get a quick post in before my little guy wakes up from his nap. It's been a quiet day here on the home front. I love days where I just get to hang out with my little guy. I even got a couple of hours to sew this afternoon, which I totally loved! I am going to finish this project for our MOPS group soon, so I can get started on some very cool Christmas gifts.

I did want to mention that I am going to make a few changes to my blog. . . not huge changes, but I have started doing art projects with my 2 year old, that I really want to share with you all (especially if you also have toddlers or work with young kids). They are quick and easy and worth the little bit of work just to see your child's face full of accomplishment! It's so cool!

I also wanted to share with my local readers that our MOPS group is having a Christmas Boutique on Saturday, November 20th. If you are in the area, please come by The Bridge and check it out. . . so many amazing vendors and LOTS of handmade gifts.

Okay, so now onto yet another pumpkin recipe. . . and it's AMAZING!!! (if not ingenious!) These pumpkin cream cheese muffins are probably the best I have ever made. . . they were so good! I ate two right out of the oven, they were so good!

These muffins do have a make-ahead portion, but it is so easy and completely worth it. It makes your muffins so clean and and tastey, that you will agree (I promise!)

The original recipe was for 2 dozen, but we can't eat them that quick (well. . . we could if we didn't have any self control), so I halved it, which was really easy.

Pumpkin Cream Cheese Muffins
adapted from Annies Eats

For the filling:
4 oz. cream cheese, softened
1/2 cup confectioners’ sugar

For the muffins:
1 1/2 cups all-purpose flour
1/2 tsp. ground cinnamon
1/2 tsp. ground nutmeg
1/2 tsp. ground cloves
1/2 tbsp. plus 1 tsp. pumpkin pie spice
1/2 tsp. salt
1/2 tsp. baking soda
2 large eggs
1 cups sugar
1 cups pumpkin puree
1/2 cup plus 2 tbs vegetable oil

For the topping:
1/4 cup sugar
2 1/2 tbsp. flour
3/4 tsp. ground cinnamon
2 tbsp. cold unsalted butter, cut into pieces

Directions:
To prepare the filling, combine the cream cheese and confectioners’ sugar in a medium bowl and mix well until blended and smooth. Transfer the mixture to a piece of plastic wrap and shape into a log about 1½-inches in diameter. Smooth the plastic wrap tightly around the log, and reinforce with a piece of foil. Transfer to the freezer and chill until at least slightly firm, at least 2 hours.

To make the muffins, preheat the oven to 350˚ F. Line muffin pans with paper liners. In a medium bowl, combine the flour, cinnamon, nutmeg, cloves, pumpkin pie spice, salt and baking soda; whisk to blend. In the bowl of an electric mixer combine the eggs, sugar, pumpkin puree and oil. Mix on medium-low speed until blended. With the mixer on low speed, add in the dry ingredients, mixing just until incorporated.

To make the topping, combine the sugar, flour and cinnamon in a small bowl; whisk to blend. Add in the butter pieces and cut into the dry ingredients with a pastry blender or two forks until the mixture is coarse and crumbly. Transfer to the refrigerator until ready to use.

To assemble the muffins, fill each muffin well with a small amount of batter, just enough to cover the bottom of the liner (1-2 tablespoons). Slice the log of cream cheese filling into 24 equal pieces. Place a slice of the cream cheese mixture into each muffin well. Divide the remaining batter among the muffin cups, placing on top of the cream cheese to cover completely. Sprinkle a small amount of the topping mixture over each of the muffin wells.

Bake for 20-25 minutes. Transfer to a wire rack and let cool completely before serving.


Tuesday, November 02, 2010

More pumpkin

Tuesday. Is it really? This week is so busy and my to-do list is ever so long and all I really want to do is sit back and enjoy life. I am taking a break from my sewing projects right now to blog and make pumpkin puree (the pumpkins are in the oven as we speak!). I am going to quickly finish this post, so I can go change and get to dinner out with the girls in my life group (something that we haven't done in awhile!).

Before I give you this amazing pumpkin recipe. . . what have you been making lately. . . please comment. . . I am curious.

Several weeks ago, I needed to come up with a super quick snack food/finger food for the Tuesday morning Bible Study I attend. This was my contribution. . . a yummy dip of pumpkin goodness paired with some crunchy, sweet apples. I only made a half batch, and it made just enough to fill my serving bowl. I will confess, my husband was a tad hesitant about me making this. . . he just didn't think it sounded good, but after one small taste, he was hooked. It seriously is like eating pumpkin pie. . . a really good pumpkin pie!


Harvest Pumpkin Dip
Tasteofhome.com

(This is the full batch, super easy to half)

1 pkg. cream cheese (8 oz)
2 cups powdered sugar
1 can pumpkin
3 tsp pumpkin pie spice
1 tsp vanilla
1/2 tsp ground ginger

Beat the above ingredients together and serve chilled. Super delish!


Enjoy everybody! I hope to be back tomorrow with another post. . . I have a lot of stuff to share (I have been busy!).

Friday, October 29, 2010

Pumpkin just never gets old!

Wow! I can't believe the first month of fall is so close to being over! Seriously, didn't it just begin? I probably have mentioned it a thousand times, but fall is just one of my favorites! Today, we celebrated fall with a trip to the zoo with one of my super good friends and her daughter. . . A fun day to be had by all, especially when the day starts out with a nice warm Pumpkin Spice Latte!

I mentioned in an earlier post that I had a bunch of new pumpkin recipes for you to try out. This is the first one, and they are scrumptious. I must confess, I never would have even thought about combining butterscotch and pumpkin, but it works. . . really. . . it's amazing!


They look beautiful fresh out of the oven with their sprinkles of powdered sugar, but I only recommend doing them to the ones that will be eaten immediately, because the powdered sugar will just get absorbed into the cookie because they are so moist.

Pumpkin Butterscotch Cookies
adapted from Joy the Baker

2 cups all-purpose flour

1 1/2 teaspoons baking powder

1 teaspoon soda

1/2 teaspoon salt

1 teaspoon ground cinnamon

2 eggs

1 cup sugar

1/2 cup canola or corn oil

1 cup canned pumpkin

1 teaspoon vanilla extract

1 cup butterscotch chips

:: Preheat oven to 325 degrees. Line cookie sheets with parchment paper or use a silpat

:: Stir the flour, baking powder, baking soda, salt and cinnamon together in a medium bowl and set aside. In a large bowl, using an electric mixer on medium speed, beat the eggs and sugar until smooth and lightened in color, about 1 minute. Stop the mixer and scrape the sides of the bowl as needed during mixing. On low speed, mix the oil, pumpkin, and vanilla until blended. Mix in the flour mixture to incorporate it. Mix in the chips.

:: Drop cookies onto cookie sheet in rounded spoonfuls. Bake for about 16 minutes. Let them cool on cookie sheet for 5 minutes before removing them to wire rack.

Wednesday, October 27, 2010

Just in time for Halloween!

I love this time of year. I love Fall things. . . crafts, baking. . . you name it. I also love the pumpkin spice lattes, the leaves falling, and the cooler air. Today, I actually turned on the heater. . . I was so cold! It was AWESOME!!!!

I finally got around to making these cookies this week and then our modem broke. . . bye bye internet. But, not to fret, because I am able steal from our neighbors wireless (shh!).

These were so easy, quick, and so much fun, that I just couldn't resist! They are a butter cookie recipe with just a hint of orange zest/juice in it that it tastes just delicious! I am looking forward to sharing these with a few special friends!

You can find the recipe over here.

I have some new pumpkin recipes to post soon and I am working on some fun sewing projects! I am so excited to show you guys everything! Have a great day everybody!

Sunday, October 17, 2010

Bar Cookie Extravaganza

Man! I am LOVING today. It is just awesome. . . a real fall-like day with sporadic spurts of sprinkles. . . and a pumpkin spice latte! I have been waiting for this for a couple of weeks, and it came at the perfect time, because I was getting tired of summer in October (a downside to living in the Central Valley!).

I have been super busy cutting out fabric and trying to dig myself out of my 'lack of motivation' hole. I am getting ready for some baby gifts that are coming up and also some centerpieces for a February MOPS night (it's the week baby boy #2 is going to be born, so I had better get ahead of myself!). Then, it's off to start on Christmas presents. I am really excited about the project for the kiddos in my family this year. . . but for now, it will have to be a secret, as I don't want anyone to find out.

I am also feeling the need to make Harvesty/Halloween things, but am soooo very distracted! But, I have been busy making lots of bar-cookie treats. . . which are fun and super quick and easy. I don't have any pictures to show you, because they were gone so quick (a good sign, I think!).

Here they are:

Double Chip Brownies
Compliments of Hershey's kitchens

Ingredients:
3/4 cup Hershey's cocoa
1/2 tsp baking soda
2/3 cup butter, melted and divided
1/2 cup boiling water
2 cups sugar
2 eggs
1 1/3 cup flour
1 tsp vanilla
1/4 tsp salt
1 cup chocolate chips
1 cup peanut butter chips

(I used chocolate chips and butterscotch chips because that's what I had. . . can I just say YUMMY!!!)

Directions:
:: Heat oven to 350. Grease a 13x9 inch baking pan.
:: Stir together cocoa and baking soda in a large bowl. Stir in 1/3 cup of butter. Add boiling water. Stir until mixture thickens. Stir in sugar, eggs, and remaining butter. Stir until smooth. Add flour, vanilla, and salt. Blend thoroughly. Stir in chips. Spread in prepared pan.
:: Bake 35-40 minutes or until they begin to pull away from sides of pan. Cool completely in pan on wire wrack. Cut into squares.

Sour Cream Cranberry Bars
Taste of Home

Ingredients:
  • 1 cup butter, softened
  • 1 cup packed brown sugar
  • 2 cups quick-cooking oats
  • 1-1/2 cups plus 2 tablespoons all-purpose flour, divided
  • 2 cups dried cranberries
  • 1 cup (8 ounces) sour cream
  • 3/4 cup sugar
  • 1 egg, lightly beaten
  • 1 tablespoon grated lemon peel
  • 1 teaspoon vanilla extract
Directions:
  • In a large bowl, cream butter and brown sugar until light and fluffy. Combine oats and 1-1/2 cups flour; add to the creamed mixture until blended. Set aside 1-1/2 cups for topping.
  • Press remaining crumb mixture into an ungreased 13-in. x 9-in. baking pan. Bake at 350° for 10-12 minutes or until lightly browned.
  • Meanwhile, in a large bowl, combine the cranberries, sour cream, sugar, egg, lemon peel, vanilla and remaining flour. Spread evenly over crust. Sprinkle with reserved crumb mixture.
  • Bake for 20-25 minutes or until lightly browned. Cool on a wire rack. Refrigerate leftovers. Yield: about 3 dozen.

Happy Baking!


Friday, October 15, 2010

Happy Birthday, George!!!

My nephew, George, recently celebrated his 3rd birthday. Well, he celebrated it 2 months ago, so I am way behind. I am posting this now, because I just now got it into the mail. My nephew loves trucks and cars, so I found this awesome fabric at our local quilt store. It is by Kocco (?), a Japanese line and is a bit heavier than other fabrics. I also loved the use of the primary colors on top of black.
Sorry for the upside down picture. I thought I had changed it. . . oh well. . . you get the idea.

The inside has red fabric with primary colored alphabet letters all over. It has one large pocket to hold a drawing pad and the other side has little pockets to hold colored pencils.

This one is a bit larger than my regular notebook covers, but the idea is primarily the same.

Monday, October 11, 2010

Strawberry Scones

This summer, as I began my pregnancy (before the yuckies came), I made up some really yummy batches of scones and flash froze them for Jon's breakfasts on mornings/weeks that I felt incredibly crummy (which was more often than not!). This summer also brought about my obsession with strawberries. . . have I mentioned I LOVE summer fruits? I am sure I have. . . it's my favorite time of year (not the heat, of course!).

The first batch of scones I flash froze was Fresh Strawberry Scones. I found the recipe over at Annie's Eats. . . and they were delicious!!!! This is perfect, because I may make another batch next week because the last of the Summer strawberries are super cheap right now, so run out and make these. . . quick!

Fresh Strawberry Scones

Ingredients:
1 large egg
¼ cup plain or vanilla yogurt
½ cup milk
1 tsp. orange or lemon zest
2¼ cups all-purpose flour
¼ cup sugar, plus more for sprinkling
1 tbsp. baking powder
½ tsp. salt
8 tbsp. cold unsalted butter, cut into small pieces
1 heaping cup diced fresh strawberries

Directions:
In a small bowl, whisk together the egg, yogurt, milk and citrus zest until blended; set aside. In the bowl of a food processor combine the flour, sugar, baking powder, and salt. Pulse briefly to blend. Add the butter pieces to the bowl with the dry ingredients and pulse several times to cut the butter into the flour, until the largest butter pieces are the size of small peas. (If you don’t have a food processor, you can just as easily mix up the dry ingredients in a mixing bowl and cut in the butter using a pastry blender or two knives or forks.) Transfer the mixture to a large mixing bowl.

Add the strawberries to the flour mixture and toss to coat. Add the wet ingredients to the bowl with the dry ingredients and gently fold together with a fork or spatula until a sticky dough has formed. Knead just a few times to ensure that all the dry ingredients are incorporated and the dough is cohesive. (Only if absolutely necessary, add more milk 1 tablespoon at a time to hydrate the remaining dry ingredients.)

Transfer the dough to a well floured work surface and pat into a disc about 7-8 inches in diameter. Sprinkle lightly with additional sugar. Slice the disc into 8 wedges.

To bake the scones, preheat the oven to 425˚ F. Line a baking sheet with a silicone baking mat or parchment paper. Place the shaped scones on the prepared baking sheet and bake until lightly browned on top, about 15 minutes. Let cool a few minutes before serving.


To Flash Freeze:

1. Slice scones into wedges and lay on lined baking sheet.

2. Place in freezer for about an hour, or until frozen stiff.

3. Take out of freezer and wrap in clear plastic wrap and place in a plastic freezer bag and freeze until ready to bake.

4. I wrapped them individually, so I could just take out what I needed and then baked them.

LinkWithin

Related Posts Plugin for WordPress, Blogger...