Thursday, July 19, 2012

Craft Tray/art station

Ethan is almost 4 and one of his favorite things to do is make art projects or crafts.  Unfortunately, I don't always have time to find something for him to do or I just need him to sit still for a bit so I can get dinner on the table.  So, after several visits to various area children's museums, I became inspired by the art/craft section.  Each museum had it set up differently, but concept remained the same. . . independent art.  There were many different bins with various things you can glue to paper or items.  Here's the one he made at the Monterey Children's Museum: 

As a result of his love for gluing things to paper. . . and the amount of time it keeps him occupied, I pulled out my brownie pan (don't worry. . . I just bought some dollar store muffin tins, so they have a new home!) and filled it with some goodies like glitter sticks, stickers, sequins, paper scraps, pipe cleaner pieces, googly eyes, confetti, tissue paper pieces, foam letters, yarn, glue, and pom poms.
The cool thing about this, is that it allows you to step back and watch your child create.  It might not make any sense to you, but it is your child'w own creation. . . and they will be proud (plus, it keeps them occupied for long periods of time!).  


Also, if you are looking for amazing deals on art supplies, I just picked up a some new pipe cleaners, pom poms, and eye balls in the $1 section at Target!  Go get them before they are all gone. :)

Wednesday, July 18, 2012

nom nom

snickerdoodles.  . . 
they are my favorite. . . and this particular recipe just kicks butt!  Most recipes end up kind of flat (seriously, I searched pinterest and all I saw were flat, beautiful cookies) and tasty, but these. . . nice, light, and fluffy!  Those people at the test kitchens for cook's illustrated really know what they are doing!  Seriously.  These things are light and fluffy.  My husband says that none can compare (and he's picky!).  I think that the key in this recipe is the cream of tarter. . . it's only a half a teaspoon.  That is significantly less than most recipes out there. Don't worry, these cookies still have that delicious taste that makes them a snickerdoodle (it wouldn't be a snickerdoodle if it didn't!

Here's the recipe:

Chewy Snickerdoodles
By Cooks Illustrated

Ingredients:
3 cups all purpose flour
3/4 tsp. baking soda
1/4 tsp. cream of tarter
1/2 tsp. salt
1/2 tsp. nutmeg
10 tbsp unsalted butter at room temperature
1 1/2 cups + 3 Tbs sugar
2 large eggs
1 tsp. vanilla
1 Tbs cinnamon

Directions:
:: heat oven to 350 degrees.  Line sheet with your favorite parchment paper or Silpat.
:: Whisk together flour, baking soda, cream of tarter, salt, and nutmeg in a medium bowl.   Set aside.
:: Beat the butter and 1 1/2 cups sugar until light and fluffy (about 3 minutes).  Add eggs and vanilla and beat until well incorporated.  Add the dry ingredients and beat until moistened, start at your lowest setting and then increase the speed to medium and beat for 30 seconds.
:: Mix together in a small bowl the remaining 3 tbs of sugar and cinnamon.  Shape the dough into walnut sized balls and dip into sugar mixture.  Place on cookie sheet and bake until lightly colored around the edges, and cookies have puffed and started to deflate, about 12 minutes.  Cool on a rack.

I have found this recipe somewhere, but I found the recipe here, when I went back to get it. . . it looks like a cool baking blog.

Saturday, July 14, 2012

A home for my Kindle


My husband surprised me with a Kindle for Mother's Day, which was perfect timing for the trip I took just a few short weeks later.  
I love this fabric by Amy Butler. . . classic!  I also thought the colors went well with my new toy (silly, I know!).
Inspiration came from several pins on Pinterest and then I just made my own pattern.  It was a perfect fit!  It has a pocket in the front and back and I lined it with some cream colored flannel, making it a nice, soft place for my Kindle to live.
Now it's time to sit back with a glass of iced tea (it's been hot here!) and get some reading done.

Thursday, July 12, 2012

30 sucks!, take 1

My best friend celebrated her big 30, last month and boy did we party (it was an awesome surprise. . . and she was surprised!).  We threw her a party the night before with an outdoor movie and fire pit and lots of sweet food. . . seriously, there may have been a severe sugar overload that night.  Anyways, the next morning (her birthday) my family and I headed out for our first summer adventure and I wanted to leave another little something on her front door (it's great that they sleep in. . . and her kids let her!).  So, I made this for her to find whenever she ventured out for the day. I will be making another version of it soon for someone else super special to me (can't say who, in case she actually reads my blog and figures it out).  
 I also made her a card that matched.  At her party, I gave her a cheap store bought card and I think she may have been slightly disappointed. . . sure glad that I knew about her surprise the next morning!
Papers are scraps from DCVW's Cafe Mediterranean, candle stamps are from SU's Party This way and words are from SU's Small Sayings.  The little round embellishments are Heidi Grace.


Tuesday, July 10, 2012

Star Spangled Fun

Last week, we had a blast celebrating our nations's independence with hot dogs, swimming, fireworks, and family.  It was so much fun hanging out with everyone and watching the kids play together.  As they get older, they are creating friendships that I hope will continue to grow.  
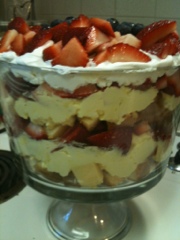
Fresh strawberries and blueberries?  Yes, please.  Make it into a patriotic dessert in honor of our our wonderful nation's birthday?  Of course.  Give the husband his choice of dessert based on a Pinterest search?  Good choice award to the hubby!
I think Trifles are the prettiest desserts.  Plus they are the easiest thing to make. . . . especially when you can just run to the store and buy a frozen Sara Lee pound cake! 
Pound cake + whipped cream + vanilla pudding + fresh fruit = pure deliciousness with a patriotic charm.  

Ingredients:
2 frozen pound cakes
1 large box vanilla pudding
1 cups milk (plus more to get to your desired consistency)
1 pint of heavy whipping cream
1/4 cup powdered sugar
fresh fruit of your choice. 
cool whip, optional

Directions:
Chop pound cakes into cubes while frozen, it's easier that way.  
Combine pudding and milk with whisk and until combined. 
Whip whipping cream and sugar with electric mixer until stiff peaks form.  Fold into pudding mixture.  
Slice strawberries.
Start layering your layers: pound cake, pudding mix, strawberries, pound cake, pudding mix, strawberries, and cool whip.  Top with strawberries and blueberries. 

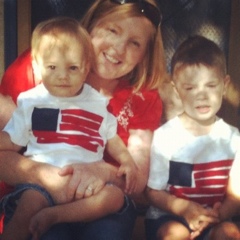
Have I also mentioned how much I love these boys?

I finished their shirts the morning of (I tend to be quite the procrastinator!).  I got the inspiration from them here (thank you pinterest!).  

Tuesday, July 03, 2012

For a good cause, part 2

I mentioned last week, that I was able to make a few things for a Dessert and Silent Auction benefiting my friends journey to serve at the Black Forest Academy in Germany.  When I had talked to my friend Marcy, she mentioned that she wanted something pretty and eye catching.  I had made this particular recipe before and knowing the craziness of the week that led up to the auction, I knew I needed to go simple, but pretty.  So, I made this: 
It's a Chocolate Raspberry Torte that was from a Quick Cooking and Taste of Home Cookbook.  It's an amazing recipe that doesn't take a lot of work, perfect for a super busy week!  

If you are interested in helping my friends raise enough support to get to Germany by the time school starts back up, you can visit their blog, here.

Chocolate Raspberry Torte

Ingredients:
1 pkg. chocolate cake mix
1 pkg. cream cheese, softened
3/4 cup cold milk
1 pkg. instant vanilla pudding mix
1 carton frozen whipped topping
2 cups fresh raspberries, plus more for garnish. 
confectioners' sugar

Directions:
:: Prepare the cake according to package directions.  Pour into three greased and floured 9 inch round baking pans.  Bake at 350 degrees for 25-30 minutes (mine didn't take that long to bake).  Cool for 10 minutes before removing from pans to wire racks to cool completely.  

:: In a large bowl, beat cream cheese until fluffy.  Combine milk and pudding mix; beat into cream cheese until smooth.  Fold in whipped topping and raspberries. 

:: Place one cake layer on a serving plate.  Spread with half of the filling.  Repeat layers.  Top with remaining cake, dust with sugar.  Garnish with extra raspberries.  Store in the refrigerator.  

Monday, July 02, 2012

banana splits

Several years ago, I was introduced to these amazing cupcakes by one of the ladies that worked in the school office that I taught at.  These were amazing!  They were like an ice cream sundae in cupcake form.  Seriously, one of the best cupcakes I had ever had.  So, when I was planning the MOPS appreciation dessert this past spring,  I planned a ice cream sundae bar and these were perfect!  

Don't they look delicious?  Seriously amazing!  

Banana split cupcakes

1 package yellow cake mix, divided
1 cup water
1 cup mashed ripe bananas
3 eggs
1 cup chopped drained maraschino cherries
1 1/2 cups miniature semisweet chocolate chips, divided
1 1/2 cups prepared vanilla frosting
1 cup marshmallow creme
1 teaspoon shortening
30 whole maraschino cherries, drained and patted dry

1. Preheat oven to 350. Line 30 standard (2 1/2") muffin pan cups with paper baking cups.

2. Reserve 2 tablespoons dry cake mix. Combine remaining dry cake mix, water, bananas and eggs in large bowl. beat with electric mixer at low speed about 30 seconds until moistened. Stop mixer; scrape down bowl. Continue beating at medium speed 2 minutes. Combine chopped cherries and reserved cake mix in small bowl. Stir chopped cherry mixture and 1 cup chocolate chips into batter.

3. Spoon batter into prepared muffin cups, filling two-thirds full. Bake 15 to 20 minutes or until toothpick inserted into center comes out clean. Cool in pans on wire racks 10 minutes. Remove cupcakes to racks; cool completely.

4. Combine frosting and marshmallow creme in medium bowl until well blended. Frost cupcakes.

5. Combine remaining 1/2 cup chocolate chips and shortening in small microwavable bowl. Microwave on HIGH 30 to 45 seconds, stirring after 30 seconds, until smooth. Drizzle chocolate mixture over cupcakes. Place 1 whole cherry on each cupcake.

LinkWithin

Related Posts Plugin for WordPress, Blogger...