Tuesday, June 29, 2010

Something new

I learned something new a few weeks ago. I learned how to can and make BBQ sauce at the same time. Although, I think canning is the greater accomplishment. I wanted to do something that was nice for the dad's in our family and found this BBQ sauce recipe that looked and sounded super good. I also wanted it to last more than 2 weeks in the refrigerator and I didn't want to give them a frozen gift.

My mom is on vacation and came up and helped me with the canning process. She brought her pressure cooker and we canned with great enthusiasm (at least I did, anyway!). It excited me to learn something new, however, it made me incredibly nervous sticking glass in boiling hot water.
For the BBQ sauce, I used this recipe from Annie's Eats. It was quite tasty, but I probably should have simmered it for the full 3 hours, but was in a hurry to go shopping before it got too hot and nap time came. I look forward to using it on some chicken in the near future!

Oven update: All hopes of having my oven fixed have been thrown in the trash since a 27inch oven is too small for the space provided. It appears that nobody knows what they are doing and it is incredibly frustrating. We'll see if this gets resolved by Christmas.

Monday, June 28, 2010

Happy Father's Day

I always find myself in a dilema when it comes to cards for men. . . especially on Father's Day. Most of my stamps are just a tad to feminine for the men in our lives, so usually Jon goes to the nearest Target or Halmark store and picks out a gross/funny, more "manly" card to meet those needs. This year, we didn't have time to go buy one. . . it has been a zoo around here!

I found an idea for a card at mmm.crafts and it led me to the printable here. Between that website and mmmcrafts, I was able to get creative with what I had and came up with card you see above. It ended up being a lot of fun, and I am sure that you can adapt it to any card for a man, just cutting off the happy necktie day at the bottom.

Happy Crafting

p.s. for those of you wondering, I am still without an oven, BUT, hope comes tomorrow, when they come to install the new oven (delivered this morning). So, if you are wondering what I am going to be doing. . . there will be fresh baked goodies at my house tomorrow (If all goes well).

Tee Time

Summer is really here. I have been relishing in temperatures in the 80's and 90's and now it is projected to be 105 today. There is something not right about waking up at 7 and sweating when you step outside. Today my new oven arrived (again) and it is going to be installed in the morning. . . I am so excited! So ready to go and start baking again. Unfortunately, I didn't have my oven fixed before Father's Day, so I ventured down for a day in Lemoore and used my mom's oven. Ethan even helped mix the batter up!

I wanted to make sometime special for Father's day for Jon's family get together. Since a lot of the men golf in Jon's family, I got really excited when I saw some golf cupcakes. Plus, they looked super easy and fun to make.
Ingredients:
1 box of cake mix of your choice (I used white, Jon's favorite)
cupcake liners
white frosting
green sanding sugar
toothpicks
scrapbook paper
double stick tape
graham cracker crumbs
candy pearls

Directions:
Make cupcakes according to box directions. When making a white cake, I use the egg white version. When they are cooled, let them freeze in the freezer. This helps with the decorating them, but also help make them super moist. Not to mention, you can make them in advance so you are not spending the night before going crazy.
Pour green sanding sugar in a shallow bowl. Frost the tops of cupcakes with white frosting and dip into green sanding sugar. Make flags out of paper and tape to toothpics. Stick those into the cupcakes and place a candy pearl near it for the golf ball. Grind graham cracker crumbs super fine and make sand pits on half the cupcakes.
So very fun to eat!
Jon wanted us to put numbers on the flags so they could be like the 18 holes. They were delicious!

Sunday, June 20, 2010

First of all, I would like to say Happy Father's Day to the greatest husband and father in the whole wide world! I love and appreciate everything you do! Thanks for all your hard work both in the work place and at home. Your son and I are so very thankful that we get to stay at home and play all day. Thanks so much!

Okay, so Father's Day is here. Family stuff is finished. . . it was a great day! Now we are home and relaxing until Ethan's bedtime (which is soon. . . he is so cranky) and then we are going to indulge in some high-end root beer floats (thanks to my husband who gave that as his one and only request for his special day. I know many of you may be thinking. . . "what are high-end root beer floats?" And I will explain: You see, my husband is what you would call a root beer snob. We don't go to Bev Mo to buy beer or wine, we go to purchase root beer. Tonight's indulgence will be with a nice cold bottle of Berghoff's. Other's of choice include Henry Weinhard, Virgil's, and this one.

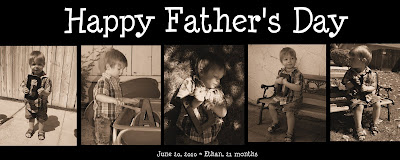
For Father's Day, my friend Steph and I got together to work on some picture of our two kiddos for Father's Day. We found the 3-dimensional cardboard letters at Michael's for 99cents (a complete steal!), and painted them black with some spray paint that Steph had at her house. She was able to hide them secretly from her husband. After that, we got together and had a quick photo shoot with the kids which resulted in over 100 snapshots and a lot of chasing on a hot summer morning. We printed them out and I put mine in a picture frame from Aaron Brother's that had held 5 4x6 pictures in a row. So cool! My husband totally loved it! If you click on Steph it will take you to her blog, where you can see how she arranged hers. . . so cute, too!
I hope all the father's in your lives had a great day!

Tuesday, June 15, 2010

Happy Birthday, Steph!

Well, this post is wishing my dear friend, Steph, a very happy birthday. Her birthday was last Friday, and we spent Saturday celebrating it with her in Yosemite and then had a busy day on Sunday with VBS registration and our small group Bible Study (aka the best small group ever!. . . I may be biased!). I have been so excited to share this with you . . . and now I can.

Steph and I live really close to one of many Savemart locations in Fresno. It just so much easier to walk there with the kiddos in their strollers than packing up our lovely toddlers (they are two weeks apart. . . someday (God willing) they are going to get married). into the cars, driving 2 minutes, unpacking them, shopping, packing them back into the car, driving home and unpacking them. Plus, it's good exercise. Anyway, Steph always has her groceries written down on a nice journal-like notebook and I thought she might enjoy a portfolio-like notebook.
This is the view from the inside. . . there is a little triangle pocket to fit business cards or that most important Starbucks card. There is also a separate pocket in the middle for a pen or pencil, and a pocket for holding recipes, mail, or coupons.
This is my favorite way to hold the notebook. Just sticking the back into the pocket and allowing the pages to hang out. This way, you can see your entire list, whether it's a "to-do" list or a grocery list. I also cut out and glued a piece of Amy Butler cardstock to the back of the notebook to make it look nicer.
The portfolio closes with a button.


Thursday, June 10, 2010

S is for . . .

S is for summer. . . swimming . . . and strawberries. Mmmm. . . . strawberries. I can feel my mouth just watering at the sound of fresh picked strawberries (good thing there sitting in my fridge!). Today is the last day of school for our local schools, and even though my little one is too young for school, it still feels like summer has officially begun!

Today has been a really fun day. This morning I got up and watched my nephew celebrate the end of kindergarten. He even had a part to memorize and say in front of all those proud parents, grandparents, and aunts and uncles. Then, I scurried to Costco to get some much need food items and headed over to my MOPS mentor mom's house for a swim gathering. I have been really blessed this year with an awesome group of mom's and it was so much fun getting together to swim and celebrate summer! And then tonight, I think we are going to go enjoy BBQ'd pizzas and more swimming with our good friends.

So, back to strawberries. . . I recently made this dessert for our small group Bible Study. I was in the mood to make something sweet and yummy, but the no oven dilemma kind of prevented me from doing any baking. Thankfully, I found this recipe last year and it requires absolutely NO baking! Awesome! So, I decided to make it again. Plus, I never blogged about it. . . so you get to see it today. . . in all it's glorious splendor!

Here's the scoop:
:: the ingredients are quite basic - store bought frozen pound cake (mine was Sara Lee), cream cheese, instant pudding, strawberries, and cool whip. . . . super easy!
:: You don't even have to have a nice bowl or trifle. Last year, I made it for a couple in our Sunday School class that had just had a new baby. . . i just made a smaller batch and put it in a Gladware container.
:: This makes awesome smaller portions. You can put it your favorite dessert bowls. I love using my stemware for parfaits! Plus, if you are new to my blog, I have a horrible obsession with bowls. . . just as my husband! In fact, I am looking forward to going to Crate and Barrel in 3 weeks. . . I know just what I want!
:: I also think that the pudding base, would taste good using the recipe from my éclair torte, if you are looking for something a little lighter.
:: The dessert directions say refrigerate for 4 hours prior to serving. . . totally not necessary!

Layered Strawberry Cheesecake Bowl

Ingredients:
3 cups fresh strawberries, sliced
3 Tbsp. sugar
2 pkg. (8 oz. each) PHILADELPHIA Neufchatel Cheese, softened
1-1/2 cups cold milk
1 pkg. (3.4 oz.) JELL-O Vanilla Flavor Instant Pudding
2 cups thawed COOL WHIP LITE Whipped Topping, divided
2 cups frozen pound cake cubes (1 inch)
1 square BAKER'S Semi-Sweet Chocolate (I just melted some chocolate bark I had on hand)

:: Optional - 1 chocolate covered strawberry. . . you can do this by dipping a dry strawberry into your melted chocolate before you drizzle it onto your dessert. Let it set on a piece of wax paper.
(I emphasized dry because if you try to dip a slightly wet strawberry, the chocolate will just come right off and looks really gross.)

:: Another hint, if you melt your chocolate and want to drizzle a very easy way. . . just put a sandwich bag into a small glass and with its edges folded over the top of the glass. Pour your melted chocolate into the bag and snip the corner and drizzle onto your dessert!

Directions:
Combine berries and sugar. Refrigerate until ready to use. Beat Neufchatel (I used regular cream cheese) in large bowl with mixer until creamy. Gradually beat in milk. Add dry pudding mix; mix well. Blend in 1-1/2 cups COOL WHIP; spoon half into 2-1/2-qt. bowl.
Top with cake, berries and remaining Neufchatel mixture. Refrigerate 4 hours.
MELT chocolate; drizzle over trifle. Top with remaining COOL WHIP.


Wednesday, June 09, 2010

The no-oven challenge continues. . . .

Not having an oven has been kind of a challenge for me. All of my go-to recipes are baked. I
am not a fan of buying store bought baked goods. . . why? They are so expensive and just not as good (when i refer to this grouping it does not include fresh baked goods from Panera or the local french bakery). I say that in frustration because my oven is still in my living room (Ugh). But, discovering the many no-bake recipes out there has been quite fun. Here's another one that I found and made last week. These were really good. So very easy, and so very tasty! The pretzels and toffee are so yummy intertwined with all the chocolate-y goodness this bark has to offer. This recipe was really easy to make and was a nice treat for my husband's lunch. I only melted enough chocolate to go in my small green cake pan (It was from the Williams Sonoma kids line a couple years ago). It also took me until mid week to get these made, so the leftovers are in the freezer.

Toffee Pretzel Bark
recipe from the Brown Eyed Baker

14 ounces dark chocolate, finely chopped
¾ cup broken pretzel pieces, divided
¾ cup Heath toffee pieces, divided
7 ounces white chocolate, finely chopped

Line a baking sheet with parchment paper or a silicone baking mat. In a double boiler or in a microwave on low power, melt the dark chocolate, stirring until the chocolate is smooth. Remove from the heat, and stir in ½ cup of the pretzel pieces and ½ cup of the toffee pieces. Spread the mixture on the prepared baking sheet. Refrigerate for at least 30 minutes. Melt the white chocolate in the same manner as you did the dark chocolate, stirring until completely smooth. Remove the baking sheet from the refrigerator and spread the white chocolate on top of the hardened dark chocolate layer. Sprinkle with the remaining pretzel pieces and toffee, using your palm to lightly press them into the white chocolate. Return the pan to the refrigerator for at least 30 minutes. Use a sharp knife to cut the bark into pieces. Store in the refrigerator in an airtight container.

Tuesday, June 08, 2010

just a quick post

Hey all! Happy Tuesday! My day is going great! I was hoping to have my oven put in today, but who knows when that will happen. At this point, it is just pure silliness and a source of pure laughter on my part. Someday. . . my oven will be move from my living room to it's proper location in the kitchen. . . someday!

But, an even better note. One of the blogs I follow (Cluck Cluck Sew) is having a giveaway from the quilt shoppe. . . it looks awesome. Click on the link to go see what it's all about. . . and good luck!

Now, I am off to get some sewing done. My friend, Steph's birthday is this week and I am making her the coolest thing! Can't wait to show you!

Have a great day!

Sunday, June 06, 2010

party favors

My mom had a bunch of white boxes that she had di-cut laying around, so she gave me some of them. I had so much fun using them for my friend Michelle's baby shower last weekend. I stamped on them, added an embellishment, and filled them with candy. I only had to make 6 of them, so I felt like I could go add a lot of detail. Fortunately, even with the extra details I added, it didn't take long!

:: I stamped a heart shape with the word "baby" around the sides in brown and blue (ink and stamp were both Stampin' Up).

:: On the top, I stamped a blue circle in an eye friendly pattern. I also added a brown smudge around the edges of the top. NOTE: To smudge the edges, take a sponge piece (I get the orange craft sponges and cut them into wedges). Then, I dab it into my ink pad and "flick" it on the edge of my paper starting from above and working down.

:: Then I punched out a brown circle and a blue scalloped circle for each one. On the brown circle I stamped the word "baby" (also a Stampin' Up stamp) with my Top Boss tinted ink pad and embossed it with white embossing powder (also Stampin' Up). I taped the two together and punched a hole using my rectangle punch and tied it to the top of the box with a piece of blue ribbon.
:: I filled them with candy and placed them at each guests' place at the shower. I was so excited to find Hershey's Miniatures. . . that use dark chocolate!!!! Don't worry, I did throw in some milk chocolate treats, too!

Saturday, June 05, 2010

No oven challenge, take 2

My husband and I loaned our son last night to my in laws so that we could get some painting done. Our living room is partially painted. Now to move the bookcases and start unpacking the rest of our boxes (they are all books!). I have a few minutes before my little guy comes back (I miss him terribly!), so I thought I would share the second treat I made while my oven was in limbo (for the record. . . a new one is sitting in my living room waiting to be installed!).
So the second new, tasty treat I made while not having an oven were Scotcharoos. I thought I had taken a picture of them, but I can't find it anywhere. I made these for Jon's lunch and then took the rest of them to the beach with us. . . where they were devoured rather quickly (thanks guys for eating them!). Basically, they are rice krispy treats made without marshmallows and frosted with a combination of melted butterscotch chips and chocolate chips. If you google scotcharoo images, you can see what they look like. They are yummy! I used the recipe from cookiemadness, which was a little different than the one I found on allrecipes.com.

Here's the recipe:

6 cups Rice Krispies cereal
1 cup granulated sugar
1 cup light Karo Syrup
1 cup creamy peanut butter (I used Skippy Natural)
1 cup butterscotch morsels
1 cup semi-sweet or milk chocolate morsels

Line a 13×9 inch metal pan with non-stick foil or line with regular foil and spray with cooking spray.

Put the cereal in a big mixing bowl and set aside.

Combine the sugar and corn syrup in a small saucepan and cook over medium heat to dissolve the sugar. Mixture will go from foggy to clear.

Remove from heat and stir in the peanut butter. Pour over the cereal and stir well. Press tightly into pan.

In a bowl set over barely simmering water or using a low setting on microwave, melt the butterscotch chips and chocolate chips together. Pour the melted chip mixture over the krispies and let chocolate cool and set. This should take a few hours. You can speed things up by refrigerating, but the bars will be a little harder to slice.

When set, lift foil from pan and set bars on a cutting board. Cut into squares.

Makes 20-24

Happy Baking!

Friday, June 04, 2010

My sewing machine has been busy!

It is baby season around here again (don't get any ideas. . . these are not for me). Last week, I had 2 baby showers on my calendar, so it was sew, sew, sew! For this gift, I used some of my Heather Ross orange, blue, and tan stripes, and polka dots.

I am loving this new idea I had for burpies. . . add some fabric swatch strips in the middle of them for extra pizzaz. I don't know. I am a little unsure of the owls in here, but they matched and so, I through them in. My favorite one is the one on the bottom.

A taggie, of course! This time, I decided to add some thin batting inside. Oh, I think I will always do this. It is just so cuddly!

I had fun making this bib. I saw the idea over at tree fall design and thought I might give it a try. I really like the way it came out. But, it was so much fun to make and way cute to give away.

I'll be back next week with some more of the projects I've been working on. Hope you have a fantastic first weekned of June!

Tuesday, June 01, 2010

is it June already?

Welcome to the first week of June! With all this weird, abnormal weather we have been having, this week hit with a blast of HOT weather and next week it has been forecast to reach triple digits. It has also been a busy week filled with house cleaning, yard work, and cookbook making. Speaking of the cookbook, I am almost done. Just need to scan some pictures and edit. I am very excited to see the finished project!

Here's a birthday card I recently made. This is a really old set of stamps from Stampin' Up called Stipple Celebrations. I used to not be very fond of this stamp, but am just loving it these days! It has everything for every kind of card making, birthday, everyday, wedding, baby, Christmas, etc. So much fun!
I am also having fun tying gross grain ribbon with a coordinating color multiple times. It is a fun embellishment that doesn't take very much, but adds a neat effect to a card or scrapbook.

:: Earlier I posted my goals for this summer. I am curious what your goals are. . .

:: Oven Update - Tomorrow a brand new oven will be installed in my kitchen! I am so excited!

:: We are painting tomorrow night. I am not sure what, but I am excited to continue making our new house have some personality! It is so much fun making this home "ours."

LinkWithin

Related Posts Plugin for WordPress, Blogger...